
Today I will be sharing with you, how to use Stampin’ Up stamps. Stampin’ Up! has three different types of stamps; wood mount, clear mount and photopolymer. They are all wonderful and high quality and they each have their own features. Sometimes, particularity if you are a new stamper, it can be difficult to know how to use the stamps, which ones to use and what the differences are.
Here are a few basics and I have also made a video to share with you, so you can see the stamps and how to use them.

Wood Mount
- They are rubber stamps and when you first get the you need to mount the on the wood blocks provided and adhere the stickers on the other side.
- Once they are mounted they are ready to use whenever you need them.
- The cases are thicker than other Stampin’ Up! cases, about double the depth of a DVD case. This is to accommodate the stamp and thick wood block. This means they take a bit more room on your shelf.
- Sometimes the wood blocks may get ink staining on them. This does’t effect the stamping in anyway.
Clear Mount
- These are also rubber stamps, exactly the same as the wood mount stamps, but they come without blocks.
- To be able to use them, you need to purchase clear blocks separately. There are a range of sizes of clear blocks. More information below.
- The cases are narrower than the wood block ones. They are about the size of a DVD case, so take up less room on your shelf.
- I personally do not put the stickers on the back of my clear stamps, as I find they don’t stick to the blocks.
- I keep the whole rubber sheet in the case. If there is a space in the rubber sheet, I know that way a stamp is missing.
- They are cheaper than wood mount stamp sets, but you do need to have clear blocks to use the.
Photopolymer Stamps
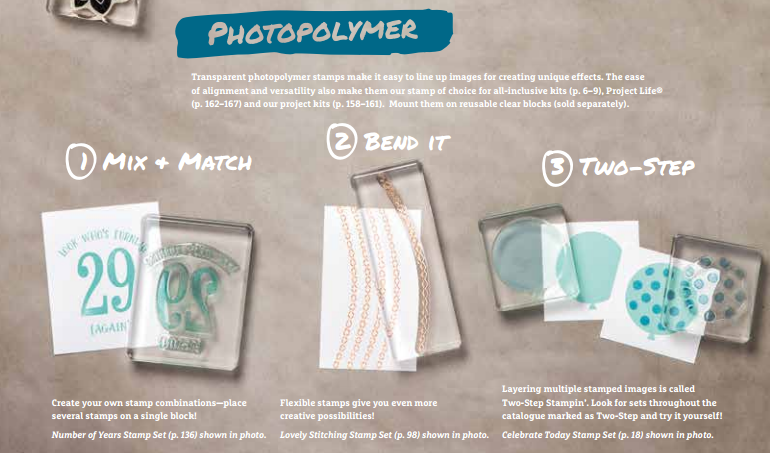
- These are acrylic, completely clear stamps, so you can see through them to line up where you are stamping. They are great to use for things like two-step stamping.
- To be able to use them, you need to purchase clear blocks separately. There are a range of sizes of clear blocks. More information below.
- They are thinner than the rubber stamps, so you need to be careful not to get ink on the block around it, which may transfer onto your work.
- Make sure you don’t store them in direct sunlight, as this will effect the quality of them.
- These stamps are flexible, unlike the rubber ones, so you can curve them etc, when stamping. Check out my video here, on how to do this.
- These stamps are likely to stain, particularly with dark pinks/red or black ink. Even after cleaning them well, you can not get the ink off, but it doesn’t effect the stamping at all. Sometimes the staining is good, as it makes them easier to see or find!
- They are clear so sometimes, particularly the very small ones can easily get lost, so you need to look after the carefully.
- When you first get them, it is good to wash them in warm soapy water (with the plug in) to get rid of any factory residue.
- If you find they don’t stick to your blocks well anymore, wash them in warm soapy water. The build up of the oils from your hands and other dirt, makes them less sticky over time.
Tips for Using Clear Blocks
- In the online store and in the catalogue (next to the price) there are recommendations on block sizes to use with the stamp set. This will help you know what sizes to use.
- There are a huge range of clear blocks to accommodate the different sizes of stamps.
- Once you have a set of blocks you can use reuse them for different stamp sets. , so over time, saving money!
- You don’t need to have all the exact sizes, but you are best to have a block size similar to the stamp size. Too big and you are likely to get ink on the block which may transfer onto your work. Too small and it won’t stamp well as the stamp as the edges of the stamp will not be supported against anything.
- You can buy the clear blocks individually or as a whole set and save 10%
- Click here to see the range of clear blocks available.
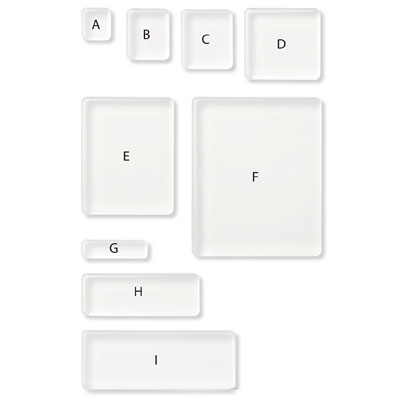
Here are the range of sizes:
* Block A: 1-3/16″ x 1-1/4″ (3 x 3.2 cm)
* Block B: 1-5/8″ x 1-15/16″ (4.1 x 4.9 cm)
* Block C: 2″ x 2-1/4″ (5.1 x 5.7 cm)
* Block D: 2-7/8″ x 2-11/16″ (7.3 x 6.8 cm)
* Block E: 3-7/16″ x 4-7/16″ (8.7 x 11.3 cm)
* Block F: 4-7/8″ x 6″ (12.4 x 15.2 cm)
* Block G: 2-1/2″ x 3/4″ (6.4 x 1.9 cm)
* Block H: 4-7/16″ x 1-5/8″ (11.3 x 4.1 cm)
* Block I: 5-7/8″ x 2-1/4″ (14.9 x 5.7 cm)
How to use Stampin’ Up Stamps!
You may also lie to check out this post about Photopolymer stamps.
If you have any questions about anytime I have shared, please feel free to email me.
If you would like to purchase any Stampin’ Up! products, and you don’t already have a Stampin’ Up! Demonstrator, I would love to be your Demonstrator. You can either order online through my online store, or email me directly. Please also check out my Loyalty Programme.
I hope you have found this post useful and you now understand how to use Stampin’ Up! stamps.